Back to Asset Essentials Main Menu
Importing budgets and budget years
*Note: The Importing feature is only available to clients who have purchased Asset Essentials Enterprise. Please contact your Sales Representative or Client Services if you are interested in purchasing Asset Essentials Enterprise.
Importing best practices
- In order to ensure that all of your data is accounted for in the appropriate format when importing new or updated data, we recommend starting by exporting a few records of existing data. Be sure to export all columns and use this as your template. You can add on, take away, or update your data from the template that you export and then import that same template back into Asset Essentials by following the Importing steps below.
- If you are importing a large number of records into Asset Essentials, start by importing only a few records first to make sure the import is accomplishing what you expected before importing the rest of the data.
- We recommend following the CSV Editing with Excel help guide in order to avoid auto-formatting issues when working with CSV files in Microsoft Excel.
- Each item that gets imported into Asset Essentials is mapped by a unique identifier. The Id field that is generated by our system on the back end is used as the unique identifier. You should not alter this field on the template in order to preserve the ability of our system to map the data back to that exact item. If you are adding a new item to the system, leave this field blank and the system will generate the Id automatically once the item has successfully been imported.
- When editing existing data for certain fields, the system may require you to edit the data in more than one column on the import template. For example, If you need to edit the Status of the item, you will also need to edit the StatusName, StatusNO, and StatusID in order for the import to be successful. *Note: If you only know the data for one of the fields you can enter the data in that column, but be sure to remove the other two columns completely in order for the import to be successful.
- Use the Validate option when importing to check for formatting errors, such as recording text in a number field. This will also check for any required fields that are missing data.
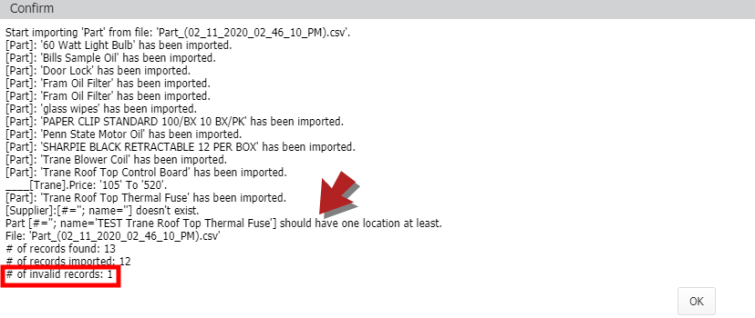
- If the import was not successful, use the Confirm window that appears to navigate to the record that was invalid. The line item will describe the change you need to make to that individual record. After making the change you will need to reimport the invalid record along with the remaining records on your import template. *Note: If all the records above the invalid record say they have been imported then you do not need to reimport those records.
Importing budgets
- Follow the first step under the Importing Best Practices section to ensure that your data is in the appropriate format when importing it into Asset Essentials.
- Click on the Work Orders menu icon, then select Budgets.
- Click the More button and choose Budget Import.
- Select the import file by clicking the Browse button and choosing the appropriate file from your computer.
- You can also choose to select the file from your Documents Library by clicking the Select option and clicking the image icon (
 ).
). - Click OK to import the file.
- Once the file imports, the name of the file will be displayed along with some additional options such as indicating whether your file has a header row and choosing a Delimiter.
- You can choose for Asset Essentials to Ignore existing records in the import file or Override existing records in the import.
- Select a Mapping from the drop-down menu.
- If no mapping has been created, click New.
- Asset Essentials will automatically attempt to match the appropriate Budget fields in the Target column with the import file's column headers found in the Source column. You can change any of the Source fields to match the Target field by selecting the appropriate field from the drop-down.
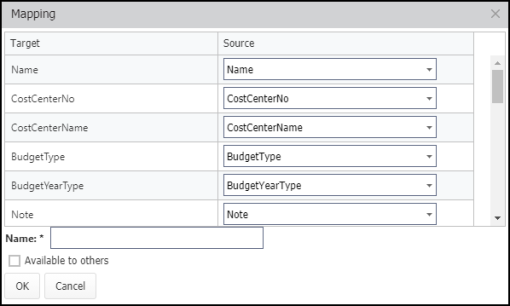
- Enter a Name for the Mapping.
- Choose whether you want this mapping available to other users.
- Click OK to save the mapping.
- To determine if there will be any errors with importing the data, click the Validate button. This will display any potential errors.
- When ready, click the Import button to import your data.
Importing budget years
- Click on the Work Orders menu icon, then select Budgets.
- Click the More button and choose Budget Year Import.
- Select the import file by clicking the Browse button and choosing the appropriate file from your computer.
- You can also choose to select the file from your Documents Library by clicking the Select option and clicking the image icon ().
- Click OK to import the file.
- Once the file imports, the name of the file will be displayed along with some additional options such as indicating whether your file has a header row and choosing a Delimiter.
- You can choose for Asset Essentials to Ignore existing records in the import file or Override existing records in the import.
- Select a Mapping from the drop-down menu.
- If no mapping has been created, click New.
- Asset Essentials will automatically attempt to match the appropriate Budget Year fields in the Target column with the import file's column headers found in the Source column. You can change any of the Source fields to match the Target field by selecting the appropriate field from the drop-down.

- Enter a Name for the Mapping.
- Choose whether you want this mapping available to other users.
- Click OK to save the mapping.
- To determine if there will be any errors with importing the data, click the Validate button. This will display any potential errors.
- When ready, click the Import button to import your data.
